Anterior cross-bite is defined as a malocclusion resulting from the lingual positioning of the maxillary anterior teeth in relationship to the mandibular anterior teeth.[1] Dental cross-bite involves localized tipping of a tooth or teeth and does not involve basal bone.[2] Patients with anterior dental cross-bite will show a normal anterior-posterior skeletal relationship with a smooth path of mandibular closure into an angle Class I relationship and coincident centric occlusion (CO) and centric relation (CR).[3] In this case study, we present a patient with an anterior cross-bite who underwent esthetic treatment. Lingual orthodontics is an effective form of orthodontic treatment that is both esthetically pleasing and inconspicuous. Modern dentistry has seen advancements in clear aligners, which have become a popular option for patients seeking a discreet solution to dental malocclusion. In some cases, a combination of lingual orthodontics and clear aligner treatment is used to achieve optimal results, saving time and avoiding unnecessary orthodontic movement [Graph 1]. This combination is referred to as hybrid orthodontic treatment, wherein the fixed component is a planned part of comprehensive, clear aligner treatment that performs skeletal or dental movements that the aligners alone could not predictably achieve.[4]

Export to PPT
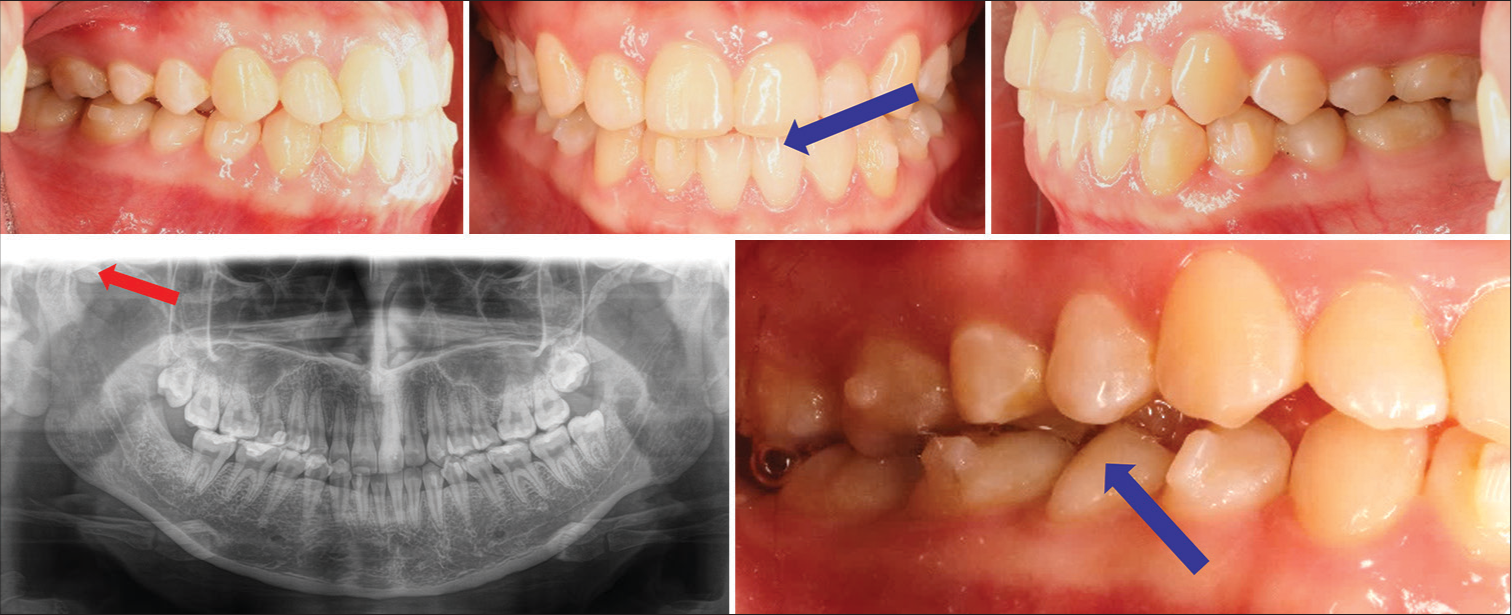
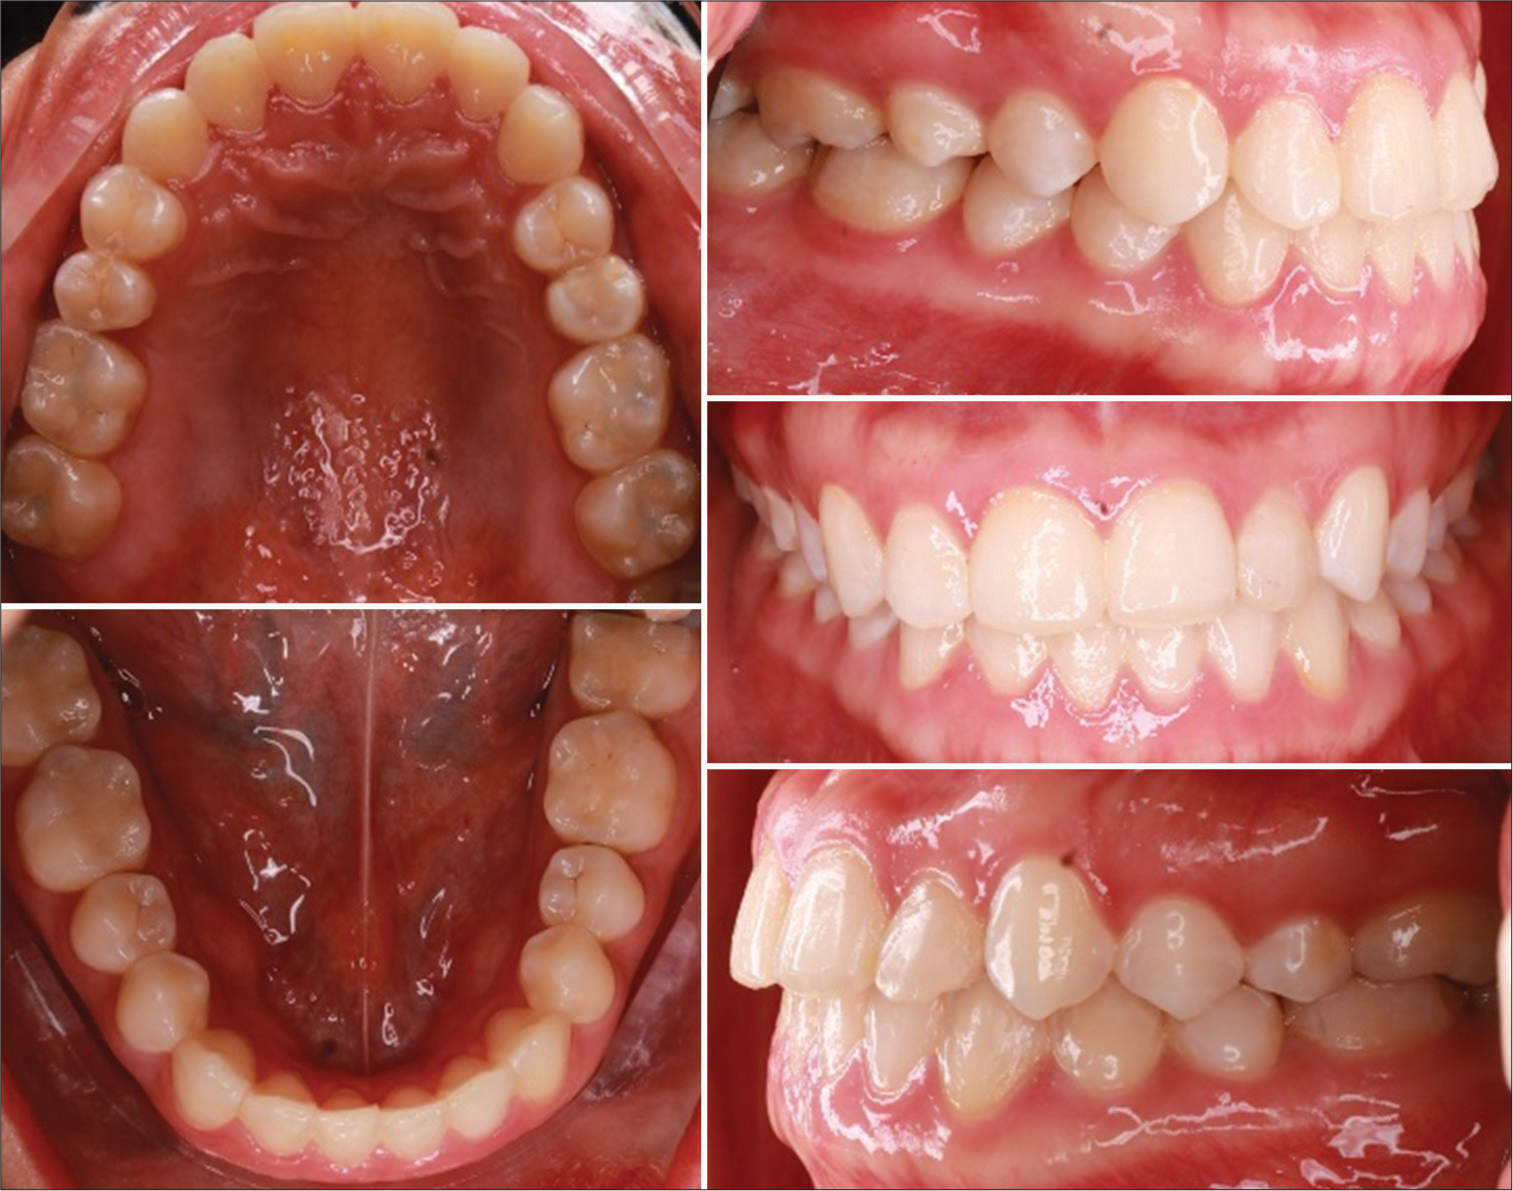
CASE REPORT Diagnosis and etiologyThis case study presents the treatment of a 24-year-old patient with anterior cross-bite and lower crowding through esthetic orthodontic procedures. The treatment involved the use of a 2D lingual appliance[5] and an in-house aligner. The patient had skeletal Class I (ANB 2.2°), concave profile with a functional shift in anterior-posterior dimension and CO-CR discrepancy, and normal buccal corridor[6] with 80% teeth exposure, resulting in an unesthetic smile due to cross-bite. In addition, the chin had shifted to the left; there was a Class III molar and Class I canine relationship, and cross-bite from 21 to 22 with an edge-to-edge bite on 23. The patient also had moderate crowding on the upper and lower arch, and the lower midline had shifted to the left by 1mm, along with impacted upper wisdom teeth. However, the condylar position was normal before the treatment [Figures 1 and 2, Table 1].
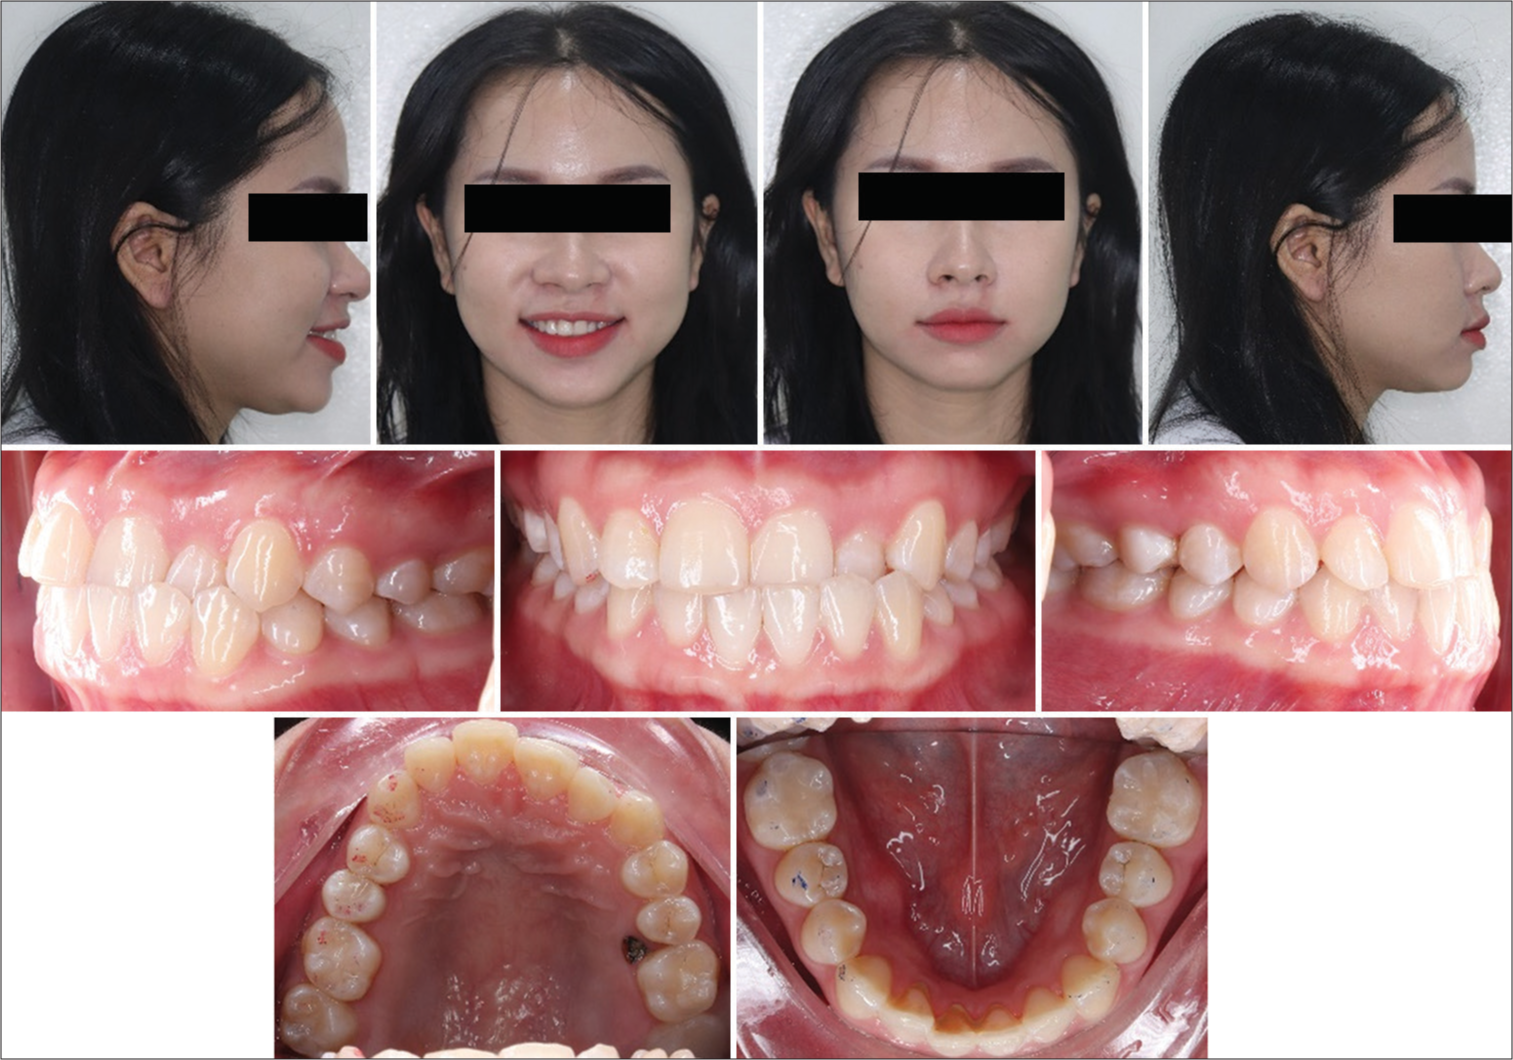
Export to PPT
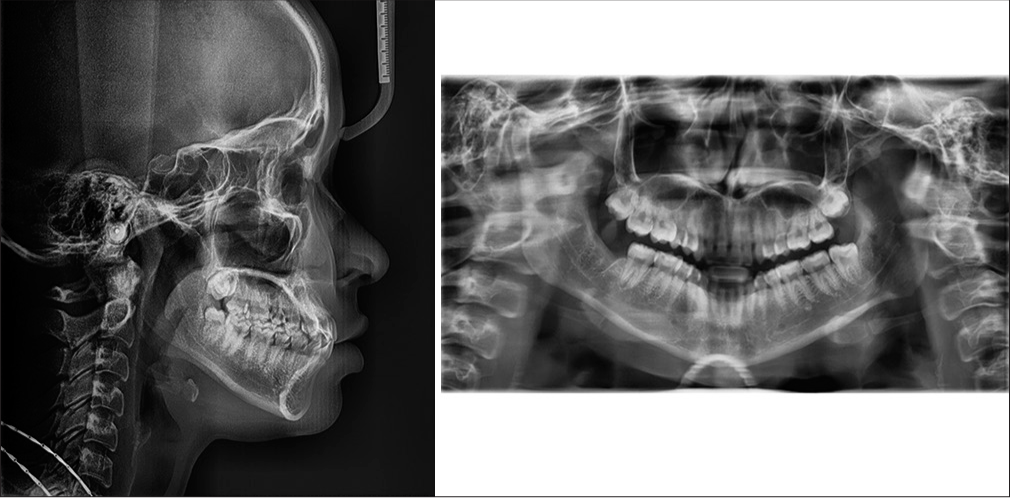
Export to PPT
Table 1: Cephalometric analysis pre-treatment
Measurement Norm Pre-treatment SNA (°) 81.1±3.7 86.4 Skeletal SNB (°) 79.2±3.8 84.2 ANB (°) 2.5±1.8 2.2 FMA (°) 25.0±4.0 29 U1 – SN (°) 105.3±6.6 104 Dental U1 - NA (mm) 4.0±3.0 3 U1-NA (°) 22.0±5.0 17.5 U1 - L1 (°) 128.0±5.3 128 L1 – NB (mm) 4.0±2.0 7.3 L1-NB (°) 25.0±5.0 32 IMPA (°) 90.0±3.5 92 UL – E line (mm) 0±2 -0.5 Soft tissue LL – E line (mm) 0±2 2.3 Treatment objectivesEliminate the anterior cross-bite and teeth alignment
Achieving satisfactory smile esthetics and masticatory function
Stable occlusion and treatment outcome in the long term.
Treatment planFirst, we discussed mechanics and the treatment plan with the patient using 3D simulation [Figure 3]. Then, we used a 2D lingual appliance using a direct bonding technique on the upper teeth from 15 to 25 and a clear aligner in-house on the lower teeth. However, normally for lingual appliances, we can use the indirect bonding technique to achieve good brackets position and less time on the chair.[7] We performed interproximal reduction (IPR) on the lower teeth from 33 to 43 by reducing 3 mm. We raised the bite and used a bonding fixed retainer on the labial side from 15 to 17 and 25 to 27 to solve the anterior cross-bite. We also extracted 85. Before the treatment, there was a 3–3 Bolton discrepancy of 80.5%. Hence, IPR on the lower was suitable for the mechanics and ensured good occlusion after the treatment. We opted for a 2D lingual appliance on the upper and a clear aligner treatment on the lower as it provided the advantages of both techniques. We designed the treatment plan after reviewing the 3D simulation. We observed that the required mechanics were to procline the upper anterior teeth and retract the lower anterior teeth on the 1st day of the treatment. The techniques were suitable for both the upper and lower teeth. With clear aligners, we could choose the desired movement and retract the anterior teeth on the 1st day, which was difficult with braces [Figure 4].
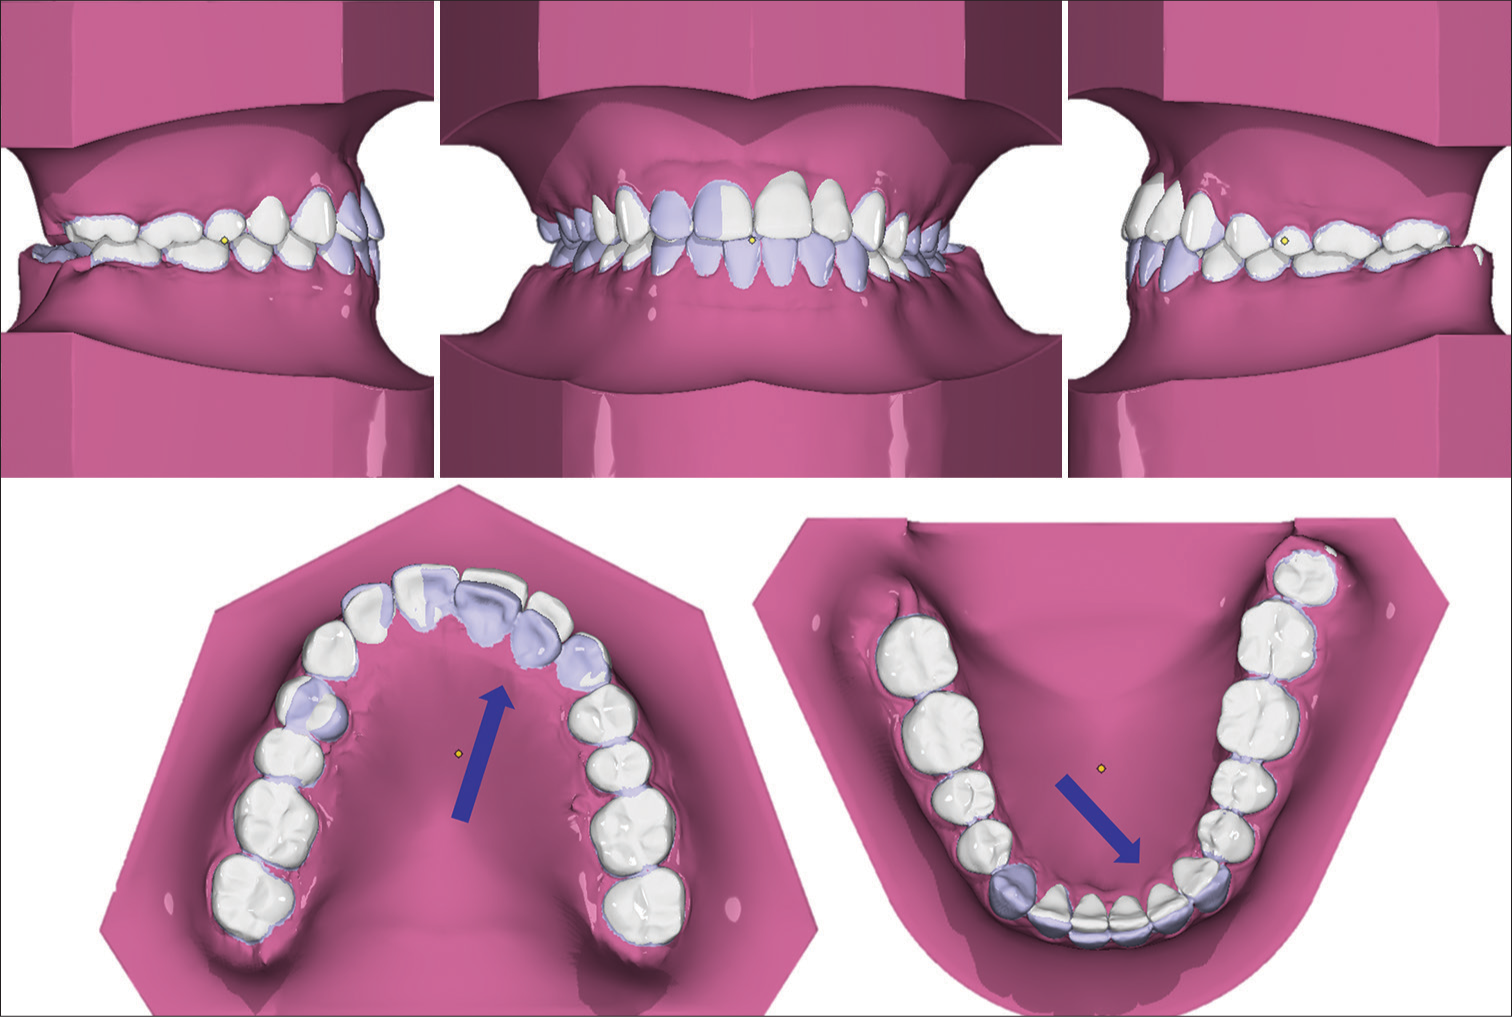
Export to PPT
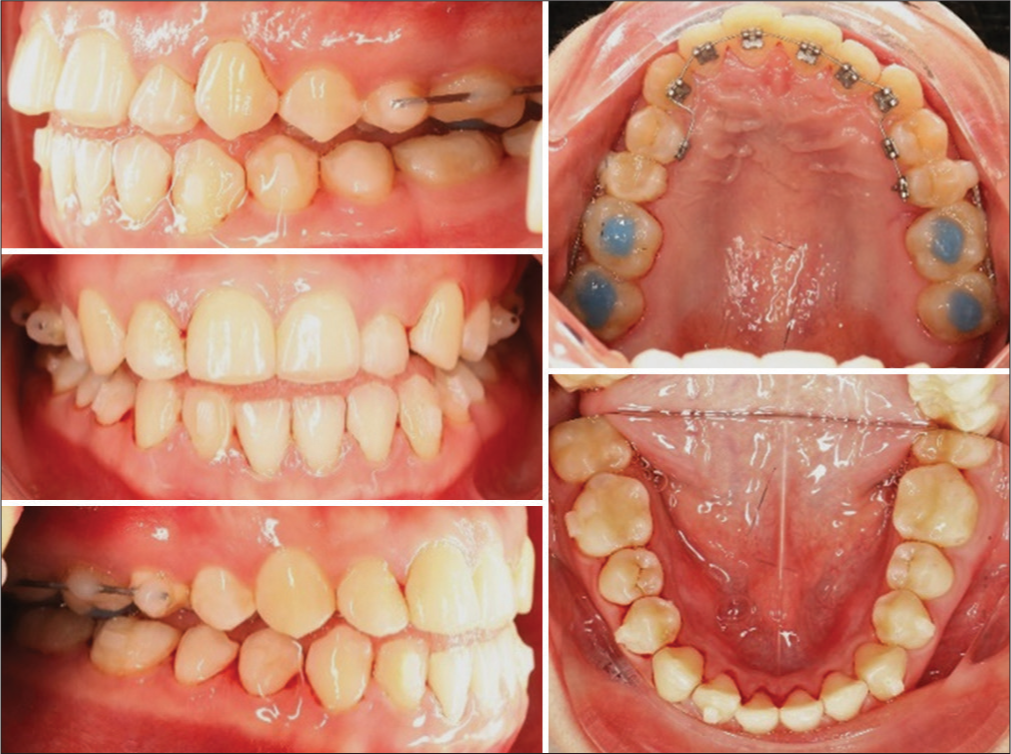
Export to PPT
During the treatment, the patient developed temporomandibular disorder[8] (TMD), resulting in a leftward shift of the mandible. This prompted a series of treatment adjustments. We removed the 2D lingual appliance, paused the treatment for 2 weeks, and switched to in-house aligners for the upper and lower teeth to continue solving the anterior cross-bite and repositioning the mandible. After 5 months of the treatment, we filled in tooth 22. Before the treatment, due to the anterior cross-bite, there was an attrition on tooth 22. In this stage, we filled tooth 22 to solve the attrition and prevent the mandibular from shifting to the left. After the filling, tooth 22 could keep the mandible in a normal position. During the treatment, the jaw moved, causing two different bite positions for the patient. As a result, we needed to guide the jaw to the correct position. Initially, tooth 12 was attrition, and we planned to restore it after orthodontic treatment. However, we decided to restore tooth 12 before completing the jaw positioning to ensure that it remained in the proper place. After reshaping tooth 12, it became longer, allowing us to secure the jaw in the correct bite position. We finished the treatment with in-house aligners for the upper and lower teeth. While undergoing treatment, the patient experienced temporomandibular joint disorder (TMD) issues, and the posterior raising bite could potentially pose a problem in the future. As a result, we removed the raising bite and 2D lingual appliance. By that time, we had almost resolved the anterior cross-bite, so I transitioned to clear aligner treatment to complete the process. With clear aligners, we were able to finish the treatment without potentially exacerbating the patient’s TMD issue [Figures 5-7].
Export to PPT

Export to PPT

Export to PPT
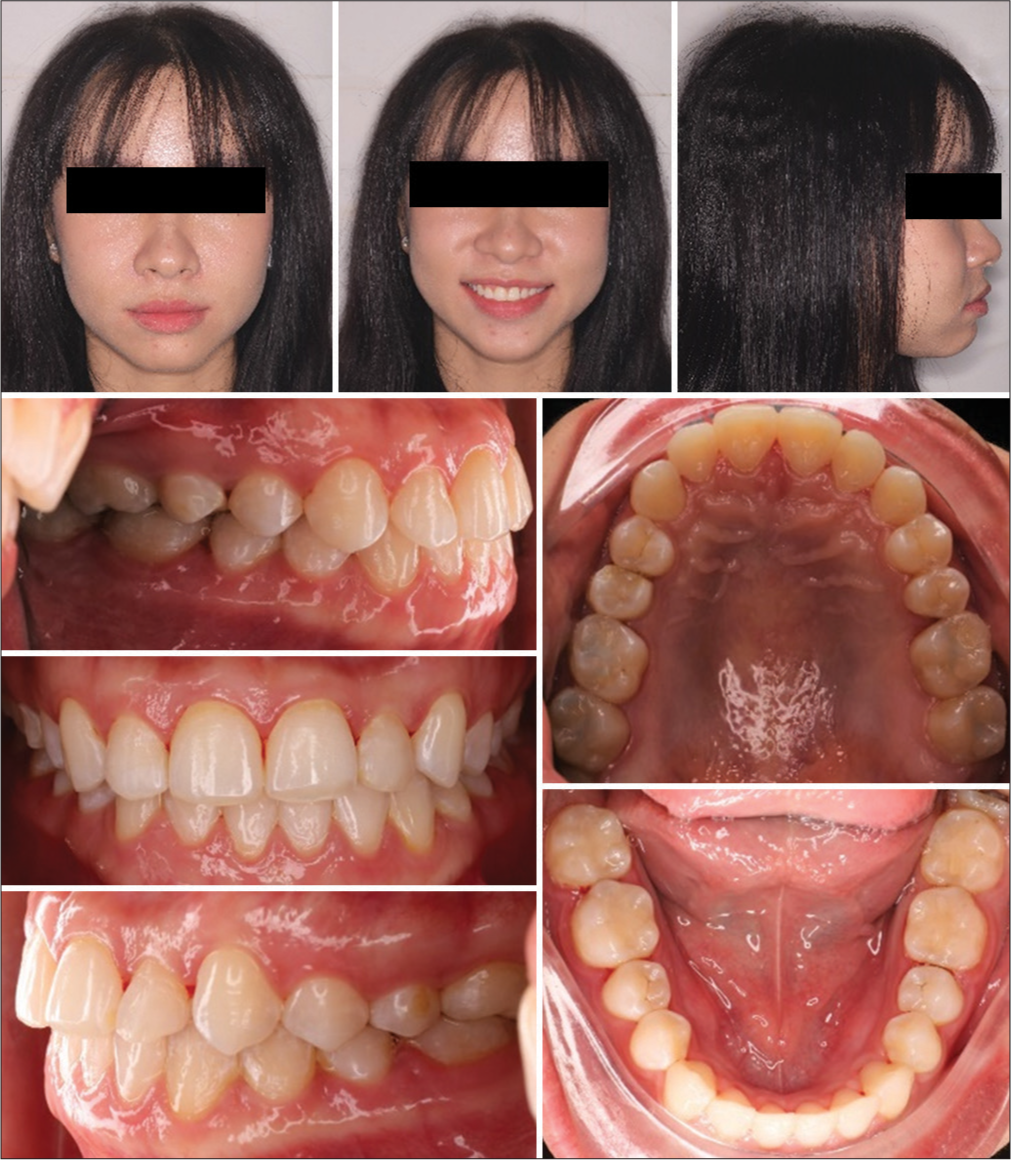
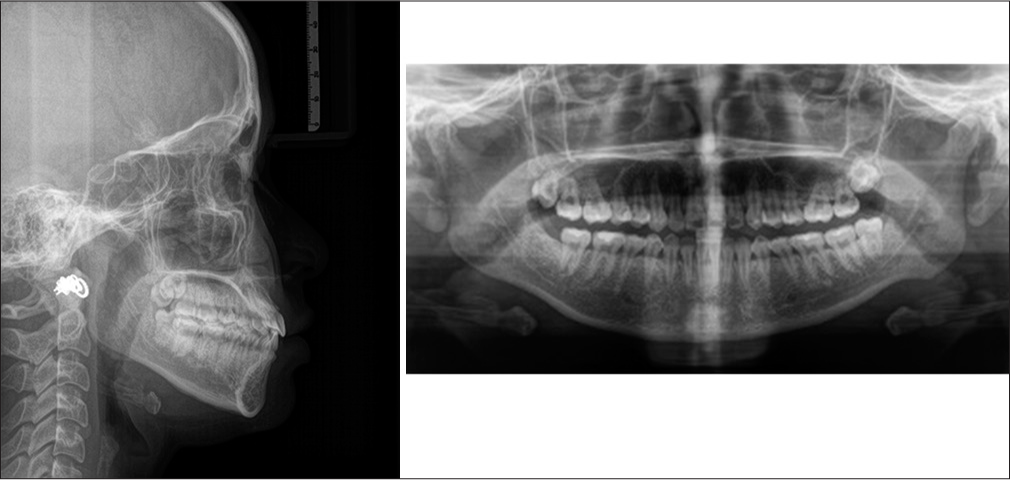
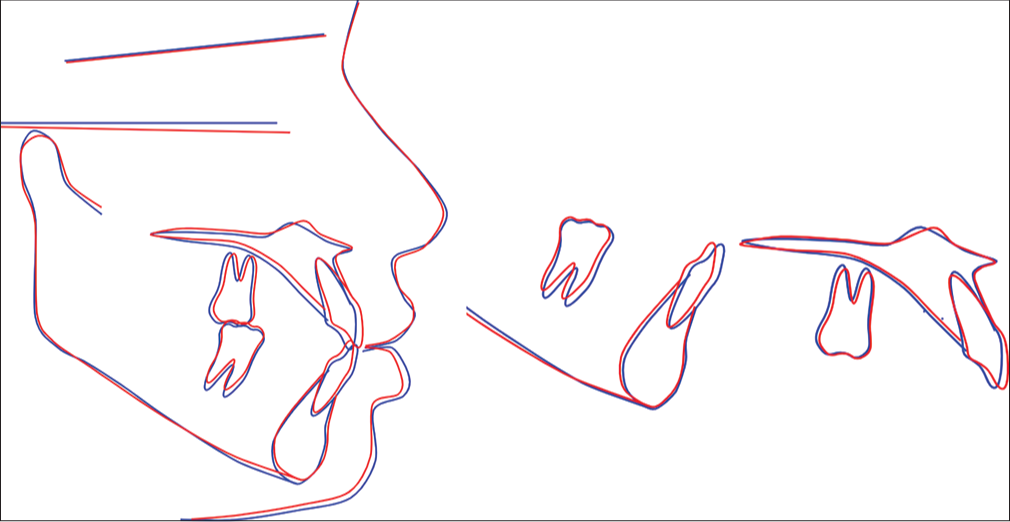
Treatment resultsAfter the treatment, we successfully achieved all the treatment objectives using esthetic orthodontic appliances. These appliances eliminated the cross-bite, aligned the teeth, improved the patient’s occlusion to Class I, enhanced facial esthetics, resolved the CO-CR discrepancy, and improved the patient’s smile in just 8 months. After the treatment, the lower midline no longer aligned with the upper midline, but this did not cause any issues. For tooth 22, a gingivectomy [9] is needed for a micro smile esthetic, but the patient declined. The superimposition showed that the results were consistent with our 3D simulation before treatment. An Essix retainer was used for the upper and lower teeth after treatment, and the results remained stable after a 1-year follow-up [Figures 8-11 and Table 2].
Export to PPT
Export to PPT
Export to PPT
Export to PPT
Table 2: Cephalometric analysis post-treatment
Measurement Norm Post- treatment SNA (°) 81.1±3.7 85.6 Skeletal SNB (°) 79.2±3.8 83.4 ANB (°) 2.5±1.8 2.2 FMA (°) 25.0±4.0 27 U1 – SN (°) 105.3±6.6 108.3 Dental U1 - NA (mm) 4.0±3.0 4.6 U1-NA (°) 22.0±5.0 22.7 U1 - L1 (°) 128.0±5.3 127.7 L1 – NB (mm) 4.0±2.0 5.5 L1-NB (°) 25.0±5.0 27.4 IMPA (°) 90.0±3.5 88.8 UL – E line (mm) 0±2 -0.35 Soft tissue LL – E line (mm) 0±2 2.2 DISCUSSIONIn this case, accelerated and hybrid orthodontic treatment using 2D braces on the upper teeth and clear aligners on the lower teeth was an ideal choice for the patient who desired an esthetically pleasing treatment. Hybrid orthodontic treatment provides the following benefits and advantages for patients:
Reduces the total treatment time over treatment with clear aligners alone
Reduces the time patients must spend wearing braces
Reduces cost of treatment in many cases
Clear, removable tooth aligners provide maximum comfort and convenience
Removable aligners allow for better dental hygiene than standard braces
Reduced emergency visits for problems with loose or broken brackets or poking wires
Aligner adjustments are completed through a simple 5-min 3D scan
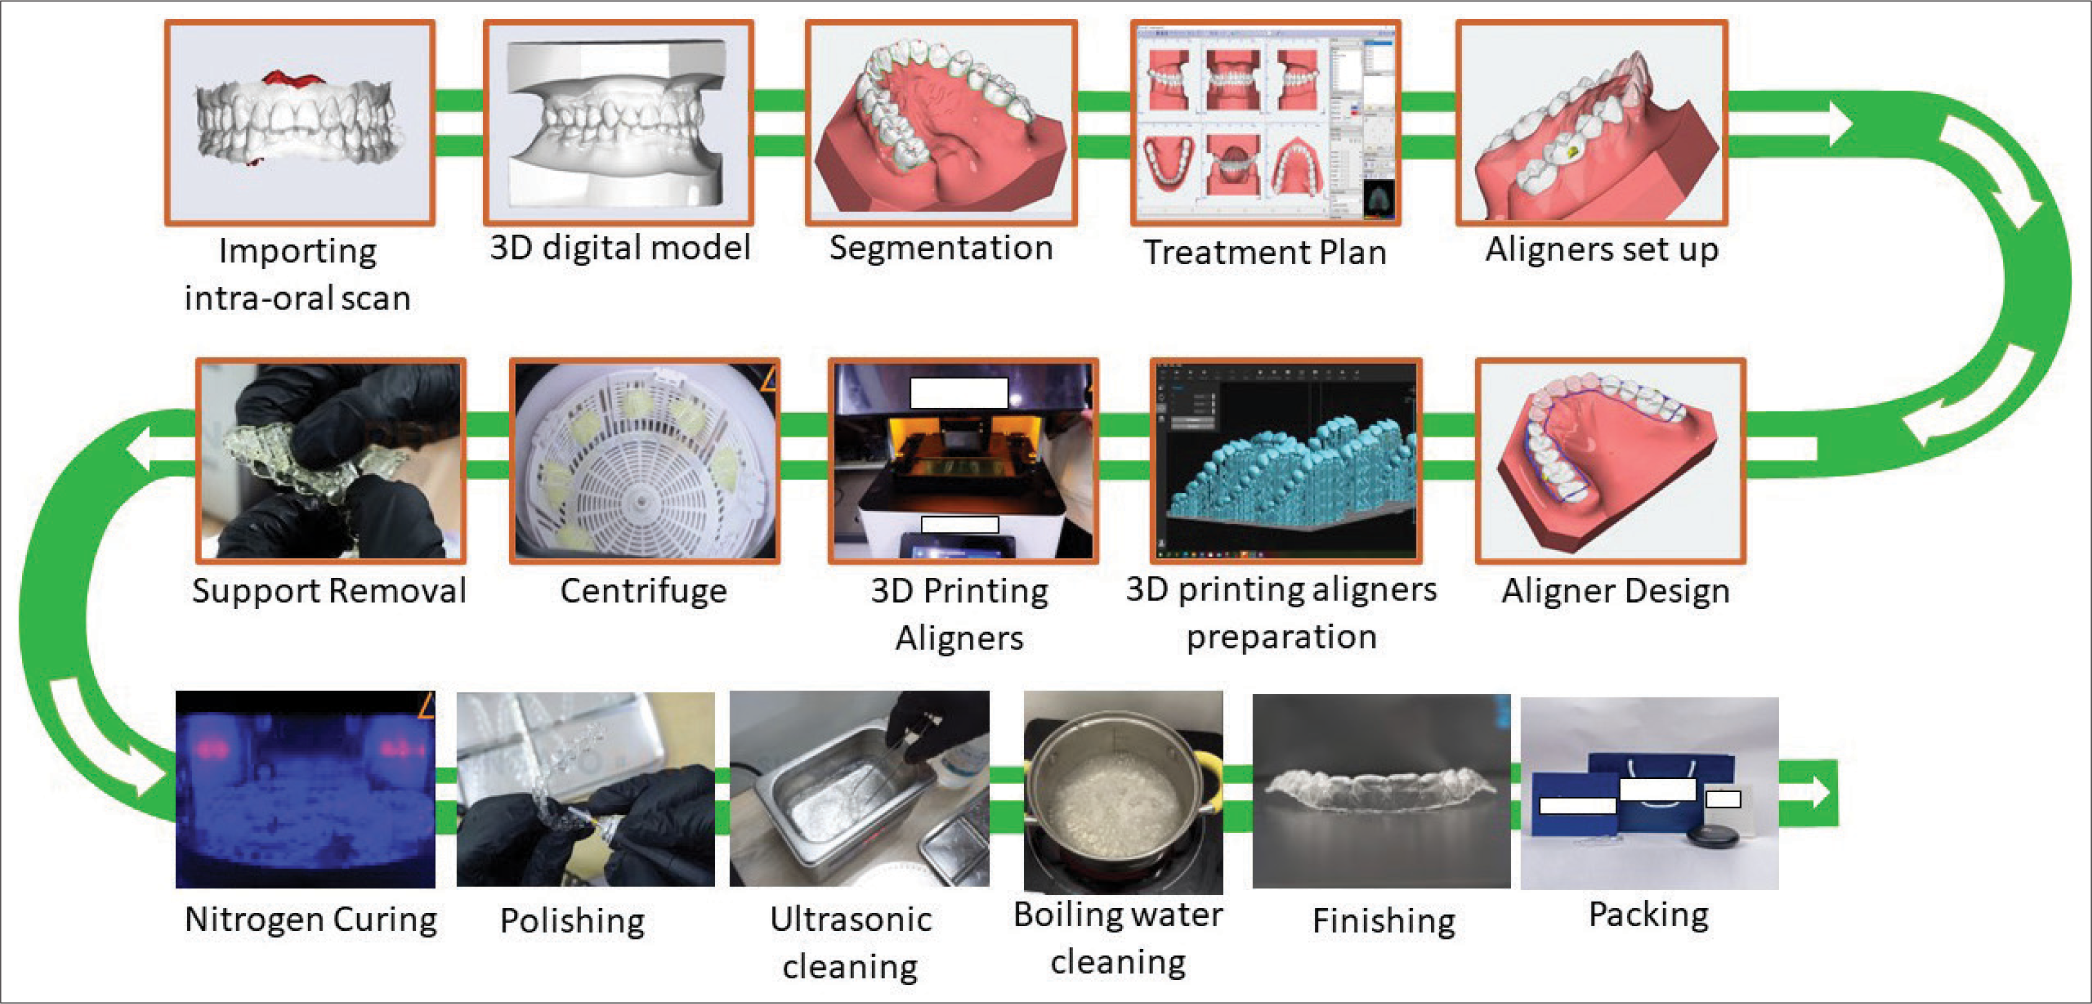
We can control biomechanics and laboratory processes in-house with our own aligner laboratory. The process of in-house aligner production is illustrated in Figure 12.
Most treatment with clear aligners is completed in 3–4 months
Improved patient compliance.
Export to PPT
Throughout the treatment process, we carefully monitored each appointment to ensure its success. However, we discovered that the patient had developed TMD during the treatment, causing the mandible to shift to the left. Fortunately, we were able to resolve this issue easily while continuing with the treatment. Clear aligners in-house with hybrid orthodontic treatment can be very effective, and hopefully, in the future, the clear aligner can be biodegradable.[10]
CONCLUSIONFor adult cases with high esthetic concerns, a combination of 2D lingual appliance and clear aligner (Hybrid treatment) can be an effective solution. Clinicians can use 3D simulation to plan the treatment and predict the movement of teeth. It is important to note that problems may arise during any stage of orthodontic treatment.
留言 (0)