
記住我


Robotic surgery is revolutionizing the surgical landscape, yet mastering the technique of local excision remains challenging. Surgeons can benefit from lesser-known tips and strategies when implementing this approach.
Tip 1: positionTraditionally, the patient’s positioning was determined by the tumor’s location, ensuring the lesion remained in the lower portion of the surgical field. This practice was imperative when using rigid rectoscopes and proved beneficial with conventional TAMIS. The reasoning for this approach stemmed from the difficulties encountered in managing lesions positioned on the upper aspect of the surgical field. Operating on lesions located at the top of the surgical field is not only uncomfortable but also makes suturing the rectal defect afterward challenging.
However, with the advent of robotic approaches, surgical procedures have become significantly more versatile. Robotic systems offer enhanced maneuverability, enabling surgeons to achieve successful outcomes with greater ease. This technological advancement has particularly revolutionized the suturing and closure of wounds, overcoming the previous limitations.
Hence, the systematic jackknife position, set at 145° with open legs and a slight head-down inclination, stands out as our preferred orientation. This choice is not solely based on its feasibility but is also driven by its efficacy in sustaining a more stable pneumorectum. The abdominal compression achieved in this position serves to prevent the unintended diffusion of gas throughout the bowel.
As important as the jackknife position is, maintaining relaxation is also necessary to avoid straining that collapses the rectal space.
In patients undergoing femorofemoral bypass surgery, vigilance is crucial to address potential issues related to pubic compression, ensuring optimal leg perfusion following positioning (Fig. 1).
Fig. 1
Patient in jackknife position
Tip 2Understanding the dynamics of intra-abdominal pressure is crucial in creating an optimal surgical field, as depicted in Fig. 2.
Fig. 2
Pneumorectum pressure dynamics
Although not strictly necessary from an anesthetic standpoint, the insertion of a bladder catheter can be beneficial by enlarging the pelvic space and facilitating rectal distension.
Tip 3Let us delve deeper into the reasoning behind the choice of using arm 123 when da Vinci Xi® arms enter from the right side of the patient in upper abdomen configuration. See Fig. 3.
Fig. 3
da Vinci Xi® docking in a 123 configuration and b 234 configuration
Space considerations
Assistant accessibility: Positioning arm 123 creates more space on the left side of the patient, facilitating better accessibility for the surgical assistant. Additionally, small adjustments with the clearance button will reduce collisions. It also facilitates good access to the airway for the anesthetic team.
Optimized platform stability: The utilization of arm 123 significantly enhances stability within the robotic platform throughout the entirety of the surgical procedure, eliminating the need for extreme arm rotations.
In summary, choosing arm 123 when the da Vinci Xi® arms enter from the right side in upper abdomen configuration is a strategic decision based on considerations of space, cart stability, and procedural efficiency. It optimizes the working environment for the surgical and anaesthetic team, and simplifies the overall robot-assisted surgical process (Fig. 3a). Figure 3b shows the 234 configuration.
Tip 4As a result of inherent limitations of the reduced space, automatic targeting is not feasible. As previously emphasized, a profound comprehension of arm positioning becomes paramount. Consequently, a manual targeting process is unavoidable, underscoring the importance of meticulous optical alignment with the patient’s spine.
Tip 5The GelPOINT Path® is best utilized with a triangular distribution of the trocars. At the apex, position the optic trocar, with the left and right working devices flanking it. The assistant port, dedicated to sutures and suction, is situated below. After completing the docking process, gently adjust the trocar positions outward towards the outer ring (Fig. 4).
Fig. 4
GelPOINT Path® trocar positioning. Frontal view
Tip 6For the GelPoint Path® insertion, the anal area must be highly lubricated and softly dilated before the insertion. The port needs to be folded as shown in Fig. 5 and gently inserted. Finally, once inserted, it needs to be unfolded.
Fig. 5
GelPOINT Path® insertion folding
Tip 7The implementation of a staggered docking technique proves advantageous in reducing collisions between ports. Trocar placement is performed before the cap is connected to the port. Then, after docking, the stepped configuration is achieved by pulling and pushing the trocars.
Generally, the optic port is positioned as the more exteriorized port in this setup in the upper position for posterior tumors and lower position for anterior ones (Fig. 6).
Fig. 6
GelPOINT Path® trocar positioning. Lateral view
Tip 8The GelPOINT Path® rings must be seen as another port. Moving it will increase the range of vision. For example pulling it upwards will show the lower part of the rectum (Fig. 7).
Fig. 7
GelPOINT Path® movements
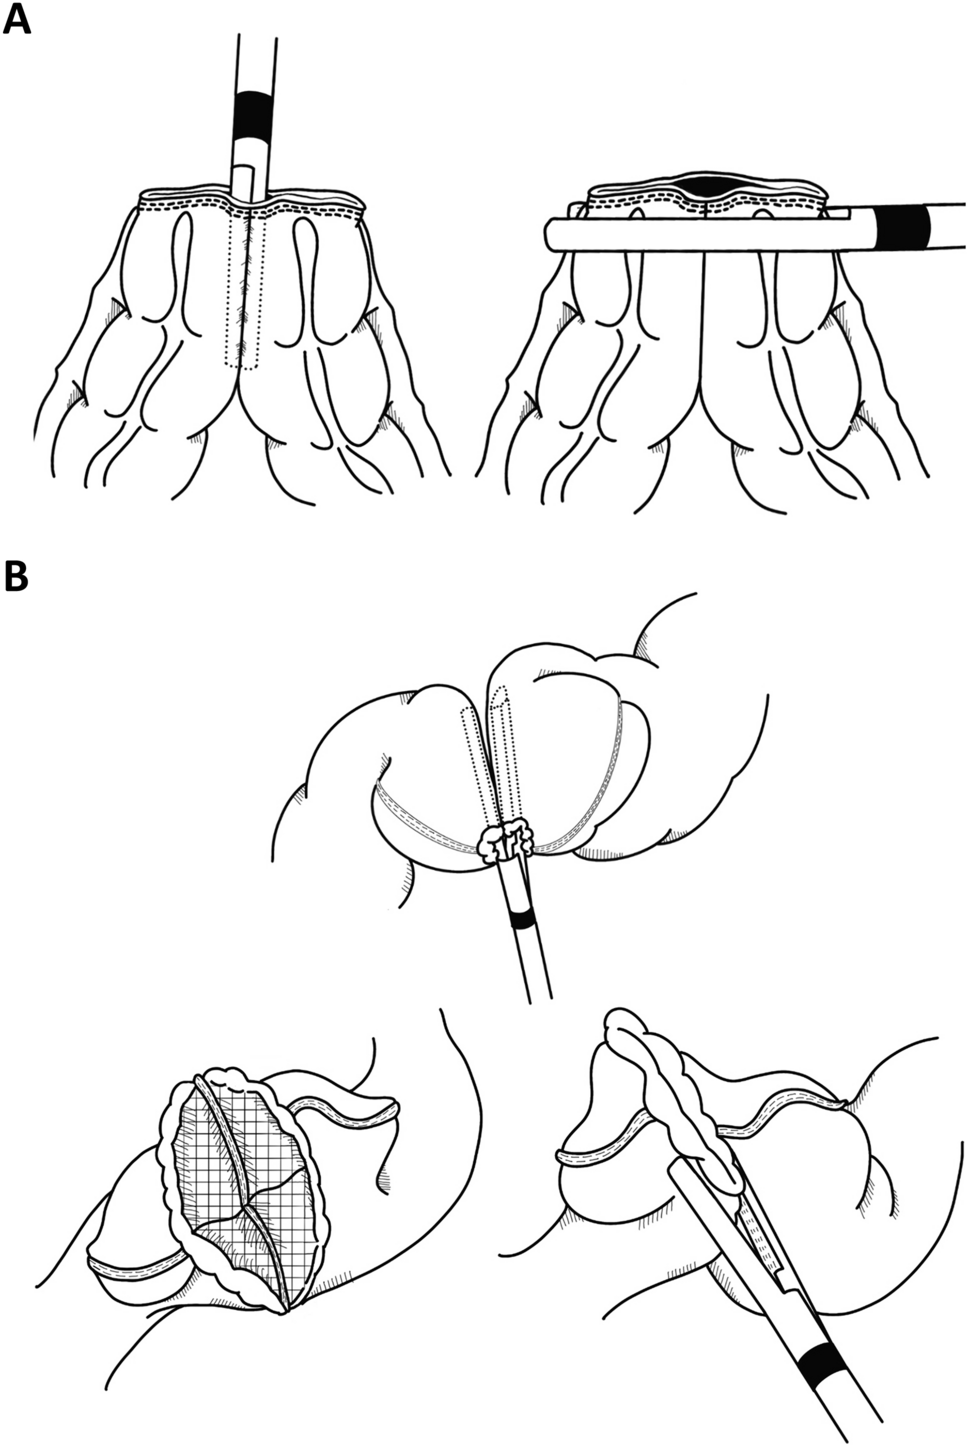
Tip 9The initial surgical maneuver involves placing marks around the lesion. However, if a stenosis interferes with this process, the first step should be to create space by cutting down the stenosis. This will provide the necessary room to navigate and mark the perimeter of the lesion (Fig. 8).
Fig. 8 Tip 10
Barbed sutures are the preferred choice for closing the defect if needed.
留言 (0)