
記住我


Pediatric forearm fractures represent 40% of all pediatric fractures.1 The vast majority occur in the distal third and can be managed nonoperatively. However, significantly displaced fractures occurring at the metadiaphyseal junction usually requires surgical fixation2 due to the highly unstable nature of the injury at the same level (Figs. 1A, B). Conventional fixation methods include transfixing with Kirschner wires (K-wires), intramedullary titanium elastic nailing (TEN) or open reduction and internal fixation with a plate. Each have disadvantages for stabilization of distal radius fractures at the metadiaphyseal junction. The fracture configuration is often too proximal to allow adequate stability with transfixing K-wires due to the short transverse segment. Intramedullary TEN is also challenging as they were traditionally designed to treat diaphyseal fractures. Because of the fracture pattern the distal segment is short and intramedullary entry into the distal radial metaphysis is challenging and often leads to malalignment. Open reduction and plate fixation remains a good option in the older pediatric population and one which most surgeons are comfortable with. It also remains the treatment of choice for irreducible fracture configurations particularly when approaching skeletal maturity. However, there is more soft tissue dissection with increased surgical risk. Furthermore, in younger children the metaphyseal segment is short which may compromise fixation and up to 58% of cases require hardware removal.3 We describe a cost-effective minimally invasive alternative method utilizing one 2 mm stainless steel K-wire to stabilize pediatric forearm fractures at the metadiaphyseal junction.
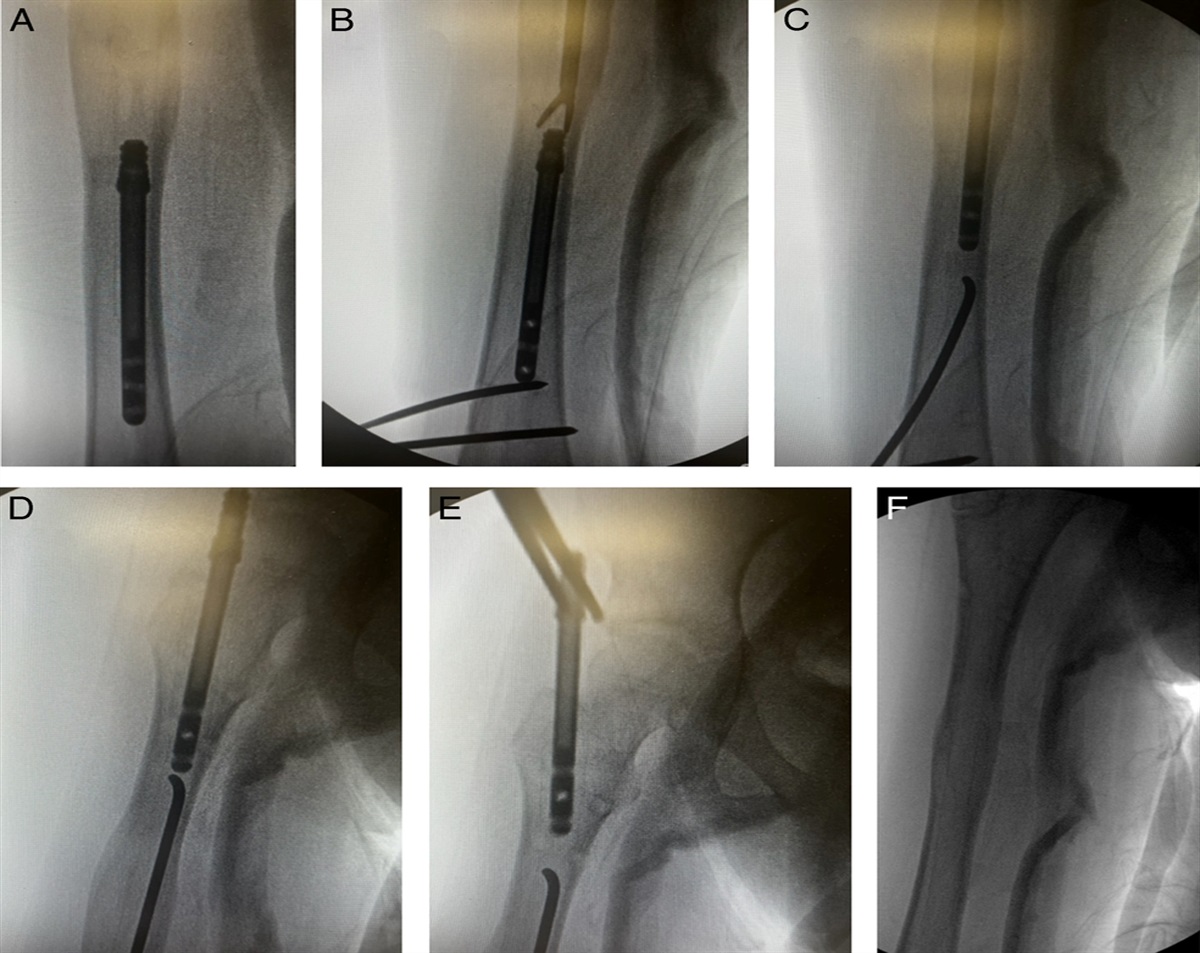
 FIGURE 1:
 Radiograhic series: (A) Anteroposterior preoperative radiograph. B, Lateral preoperative radiograph. C, Anteroposterior intraoperative image-intensifier film. D, Lateral intraoperative image-intensifier film. E, Anteroposterior postoperative radiograph. F, Lateral postoperative radiograph.
TECHNIQUE Step 1—Achieving Closed ReductionFollowing closed reduction of the radius under image intensifier in a standard fashion the ulna will usually also reduce. Any residual malalignment is corrected with direct pressure. If satisfactory reduction of the radius and/or ulna is not achieved in a closed fashion then a percutaneous 1.6 mm K-wire is inserted through a dorsal stab incision into the fracture site and used as a lever to facilitate reduction. In the event that satisfactory reduction cannot be achieved by these means then the technique is abandoned and progression to formal open reduction and internal fixation is recommended.
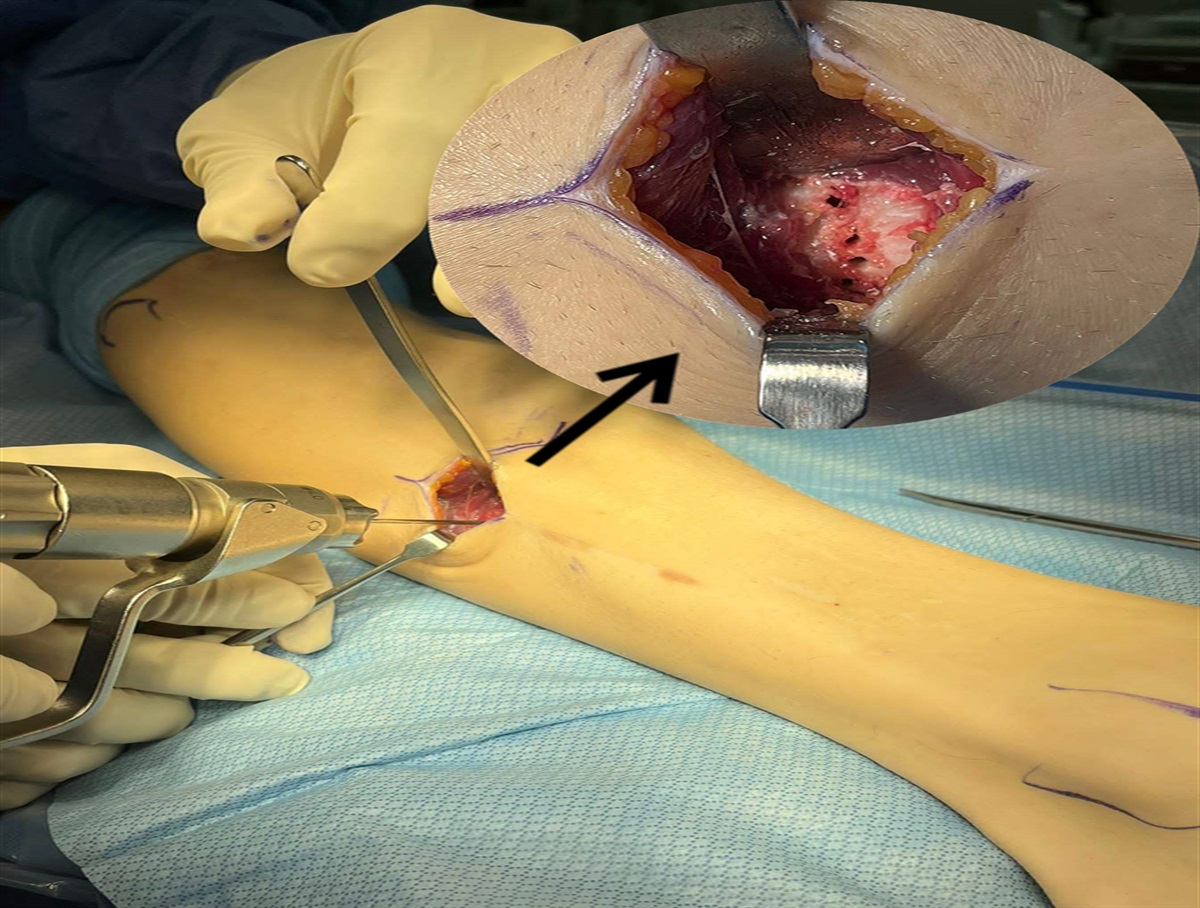
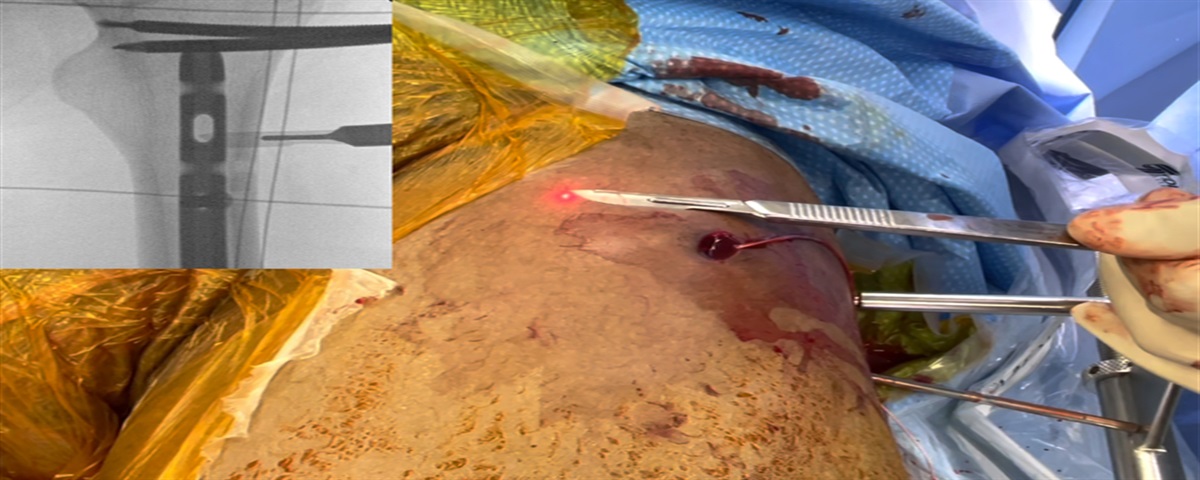
Step 2—Approach and Establishing Entry PointWe recommend using a K-wire which corresponds to 40% to 80% of the narrowest diameter of the medullary canal. In very narrow canals a 1.4 or 1.6 mm K-wire can be used, however, in the vast majority of cases a 2 mm K-wire is selected. The K-wire is used to ascertain the trajectory of insertion and under image intensifier (II) guidance a mark is placed on the skin with a surgical marker. A 10 mm longitudinal skin incision is placed just distal to the radial styloid in line with the radiocarpal joint. Care is taken to identify and protect the sensory branch of the radial nerve. The incision is deepened to bone through blunt dissection. With the carpus held in ulna deviation, a 2 mm K-wire is held “free hand” under II to mark the entry point at the radial styloid (Fig. 2). Confirmation of both the entry point and the trajectory of the wire is crucial. An angle of 75 degrees or greater in relation to the axial plain has been shown to deflect 2 mm K-wires in pediatric humeral fractures.4 Therefore, a trajectory of >75 degrees in the coronal plane is sought to minimize medial cortex penetration.
 FIGURE 2:
 A schematic diagram to illustrate the correct entry point and trajectory of the Kirschner wire in both the coronal (A) and sagittal plane (B).
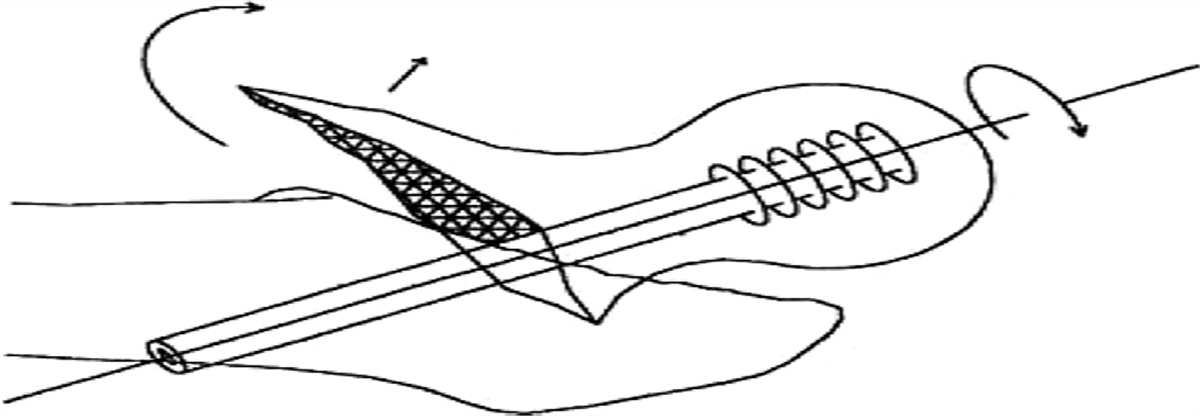
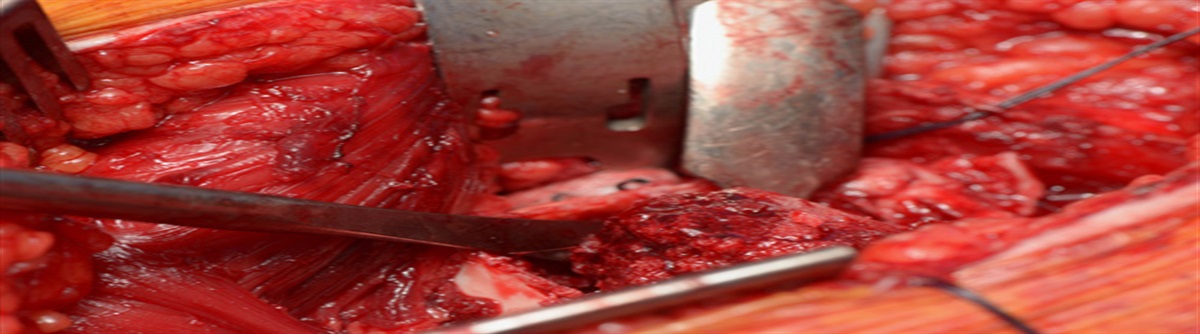
Step 3—K-Wire InsertionOnce the entry point is confirmed in both anteroposterior and lateral planes the K-wire is inserted through the radial styloid. The radial physis is crossed in a single pass aiming for the medullary canal. The wire-driver should be activated slowly to minimize thermal injury to the physis. The K-wire is advanced initially using the wire-driver in oscillate mode to prevent soft tissue wrap and under II guidance. Just before contact of the medial cortex the wire-driver is switched to a T-handled Jacobs chuck. A toffee mallet is used to gently strike the T-handled chuck to advance the K-wire. The trajectory of the K-wire once passed across the fracture site in the vast majority of cases lends itself to rebound off the medial cortex allowing the wire to pass intramedullary. In the event of suspected medial cortex penetration or meeting resistance refer to Table 1. The K-wire is passed ∼10 cm beyond the fracture site (Fig. 3).
TABLE 1 - A Table to Show the Top 4 Most Encountered Complications With Corresponding Mitigation Measures Complication Mitigation Medial cortex penetration of the Kirschner wire (K-wire) Avoid driving the K-wire on power at full speed. Instead use a gentle tapping action of a toffee mallet on Jacobs T-handled chuck secured to the K-wire If medial cortex penetration occurs then often the straight K-wire will follow the same path. In this scenario a small prebend of 15 degrees is all that is required to guide the K-wire away from the medial cortex of the radius Remove the K-wire and cut the sharp end creating a blunt tip before replacing through same entry point and trajectory Pin-site irritation/wound problems due to obliquity of K-wire and pin migration Avoid creating a proximal incision. Tethering of the skin on the wire should be carefully assessed and released fully to accommodate the wire Ensure at least a 45 degrees bend on the wire at the bone-wire interface. This eases pressure on the skin Ensure at least 5 mm gauze padding at the skin-wire interface Superficial radial nerve neuritis Avoid blind insertion of the K-wire. Instead create a 10 mm incision and identify and protect the superficial radial nerve at all times K-wire driver should be used in oscillate mode K-wire should not be cut flush and buried under the skin near the superficial radial nerve Distal radial physeal injury Avoid multiple passes of the K-wire across the physis. Most important aspect of the operation is to confirm the K-wire entry point and trajectory before advancing the K-wire 2 mm K-wires are stout and can cause injury if attempt is made to bend against the bone. Avoid bending the wire without secure counter pressure at the bone-wire interface Avoid using the K-wire driver at full power to drive the wire across the physis. This can cause thermal injury FIGURE 3:
 A schematic diagram to illustrate the correct final position of the 2 mm Kirschner wire (K-wire) in both the coronal (A) and sagittal plane (B). Note the K-wire has been advanced 10 cm beyond the fracture site. The distal end of the K-wire is bent at 45 degrees to exit the skin and then bent again to avoid skin irritation.
Step 4—K-Wire CareAt the end of the case the distal end of the K-wire is bent to at least 45 degrees to exit the wound. Care is taken to secure the base of the K-wire as it enters the radial styloid with heavy needle holders. The wire is bent around the needle holder to prevent inadvertent injury to the physis during bending. A second bend in the K-wire is made in a similar fashion just distal to the first to minimize skin irritation. The distal end is cut to ensure a blunt tip and a plastic safety cap is applied. The skin surrounding the wire is inspected for tethering and released with a blade if necessary. Satisfactory stable reduction is confirmed with II (Figs. 1C, D). Fixation of the ulna is usually not required. The skin is loosely closed around the wire with 3-0 monofilament absorbable sutures in an interrupted fashion. The skin is dressed with a nonadherent paraffin jelly impregnated dressing. A 5 mm thick soft gauze is placed between the cut end of the K-wire and the skin. Our preference is immobilization in an above elbow plaster cast in neutral forearm rotation.5
Step 5—AftercareA “collar and cuff sling” is provided and radiographs at follow up illustrates that fixation is adequate and alignment is maintained (Figs. 1E, F). The K-wire is removed at 4 weeks in the out-patients clinic and decision is made whether more time in cast is necessary dependent on age and clinical/radiologic review.
EXPECTED OUTCOMESConventional fixation of pediatric distal radius fractures at the metadiaphyseal junction is either with intramedullary TEN or formal open reduction and internal fixation with plate osteosynthesis. Transfixing with K-wires is challenging due to the proximal location of the fracture. We utilize a 2 mm intramedullary stainless steel K-wire to stabilize the fracture which is comparable to the standard 1.5 to 2.5 mm diameter TENs. Our technique presents a few advantages over previous techniques. The procedure is minimally invasive utilizing an incision of 10 mm. This avoids complications associated with formal open reduction and internal fixation with faster recovery. The K-wire can also be removed in the out-patient clinic avoiding a second anesthetic and operation which increases risk and cost. Finally, TENs have been shown to cost 26.6 times more than a K-wire per implant.6 Coupled with the cost of return to theaters, the difference is significant.
COMPLICATIONSThe most common complications encountered using this technique are summarized in Table 1. However, with careful surgical technique the vast majority of complications can be mitigated. In the event that multiple passes fail to achieve a satisfactory reduction, to prevent further physeal injury, we recommend open reduction and plate fixation as the salvage option.
Overall we describe a cost-effective alternative technique in the management of pediatric distal forearm fractures at the metadiaphyseal junction.
REFERENCES 1. Jones K, Weiner DS. The management of forearm fractures in children: a plea for conservatism. J Pediatr Orthop. 1999;19:811–815. 2. Handoll HHG, Elliott J, Iheozor-Ejiofor Z, et al. Interventions for treating wrist fractures in children. Cochrane Database Syst Rev. 2016;2016:CD012470. 3. Van Egmond JC, Selles CA, Cleffken BI, et al. Plate fixation for unstable displaced distal radius fractures in children. J Wrist Surg. 2019;8:384–387. 4. Iobst C, Thompson RG, Grauer J, et al. How to prevent K-wire bounce in oblique supracondylar humerus fractures. J Orthop Trauma. 2018;32:e492–e496. 5. Fraser-Moodie JA, Bell S, Huntley JS. Above versus below elbow casts following manipulation of paediatric forearm fractures: is the existing literature consistent with our experience? Orthop Proc. 2013;95-B(suppl 31):34. 6. Heare A, Goral D, Belton M, et al. Intramedullary implant choice and cost in the treatment of pediatric diaphyseal forearm fractures. J Orthop Trauma. 2017;31:e334–e338.
留言 (0)